PROJECTS
An Inside Look
 |  |  |
|---|

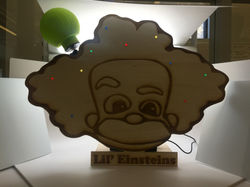
LIL EINSTEINS INTRO PROJECT
By: Haley Barns, Michael Burns, Nathan Gillaspy, Mel Heitmann, and David Li
For our introduction project, my team and I came up with the name "Lil Einsteins". This project was a combination of Arduino programming, a laser cut character, and a 3D printed light bulb powered by a motor. Our initial design included a laser cut head, with an acrylic light bulb that would rotate on the top of the character's head. However, we were unable to get the lightbulb to light up, so we took it out of the design.
We split the project up based off of everyone's skill levels. I helped with the design of the nameplate and the Arduino code. We had 10 LED lights on the project all coded with the same Arduino kit. We were going to use a button coded in the program, but couldn't get it to work properly so we had to alter the design. Instead we used a battery pack that powered it all.
This project helped me grow as an engineer by developing skills that are beneficial in any future career. We grew as a team and were able to come together to create this final product. I also learned several skills like how to program with Arduino, how to use a laser cutter, and how to create objects with a 3D printer. The workshops we took outside of class furthered my talent as an engineer.


MODULAR MINI
GEEN Projects 1400 - Summary
For my team's final project, we decided to recreate a small match box car. We wanted to reimagine the idea of toy cars with a new design aspect. It consisted of small customized cover pieces and a personalized track. This project was made with 3D printers, laser cutters, and soldering skills. Our team had to go through several prototypes for the base of the car, adjusting the dimensions as we made changes to the initial design.
The first two pictures are examples of the final cover pieces that we were able to create for our car. Each colored piece is a different initial CAD design that is capable of mismatching with the other files. The third picture is an image of all of the different prototypes we created for the car's base. The fourth image shows the interior of the car that consists of the gear and motor system that we used to power it.
Client
Our target client is boys and girls six years and older. We chose this age group specifically because our car has some aspects that aren't suitable for smaller children. With the exposed gears and motors, we wanted kids to have a hand on experience with an engineering aspect. The customized pieces also allow kids to be creative giving them several combinations of both covers and track patterns.
Design Requirements and Restrictions
Modularized
Long battery life (at least 1 hour of consistent run time)
Fits with custom track
Simple on/off switch
Not too complicated for children
Interchangeable features
Light weight
Easily manufactured track
Overview of Design Process
The design process was a series of trial and error. We had to go through several iterations of CAD designs to ensure we had the proper measurements. For our first design we created spots for two A23 batteries. However, we wanted to make the car more practical so we switched the model so it could hold a battery pack with four AAA batteries instead. This change lead to more adjustments in the CAD design.
We also had to change our original wheels. At first we had small, simple wheels with spokes. Once we printed them, we realized that they were too small to support the car itself. Therefore, we created larger rims and made the tires themselves out of flexible filament (TPU). This allowed more traction on the wheels propelling the car around the track. With the new rims, the car was well supported, but the sides would get stuck when it went around the track. In order to solve this issue, we had to put a slight angle around the outside of the rims so they followed the railings more smoothly.
When it came to the design of the track, we tried several materials ranging from plywood to cork board. I tried to laser cut the cork board and found it that it was too fragile to stay in one piece. When I took it out of the laser cutters, the pieces ripped and fell apart. So instead, I used plywood and after several runs, the track finally cut through. In order for the car to stay on the track I added side railings that were about an inch high. Once the track was finished, we were able to test the car successfully.
Testing
In order to test our product, we allowed younger children to play with our car. We wanted to ensure that it was durable enough for little kids. We also were able to run the car on the track to test the battery life for the car, fortunately, it lasted just over an hour before the batteries died. Another aspect that we had to check was the complexity of the pieces. In order to make the covers as simple as possible, we included magnets so that the parts would just stick into place. Overall, the testing was very successful and we felt very confident with our final product.
Conclusion
This project was a huge success at our design expo. It created several obstacles in the process of building it that gave our team the opportunity to collaborate. This project in particular expanded my knowledge in CAD and laser cutting. With the several prototypes we had to build, there were many occasions to strengthen my skills. As a team, we were able to help each other with weaknesses and learn from one another. This allowed us to be more successful with the process as a whole.
After completing the final project, I understood a greater importance of communicating with a team. Without constant communication with each other, there could have been several challenges we wouldn't of been able to overcome. Engineers are meant to bounce ideas off of one another, which is why our product turned out the way it did. As a group we were able to complete all of the tasks in a timely manner, allowing for extra time to polish our small car.
Appendices
Budget
Battery Pack -$2.00
PLA Filament -$60.00
TPU Filament -$15.00
Batteries -$6.00
Magnets -$9.00
Wood -$50.00
Motors -$13.00
Gears -$8.00
Switches -$2.00
Bearrings -$8.00
Paint -$8.00
Axels -$2.00
Diodes -$1.00
Total - $184.00
